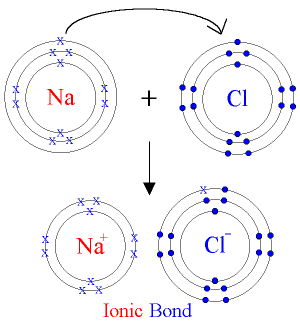
We were first introduced to the periodic table. The periodic table was introduced by Dmitri Mendeleev in 1869 and is one of the essentials in chemistry. It provides a way of organizing the elements so that it is possible to study more about the various elements about their chemical and physical properties. It has played a very important role in allowing scientists to make new discoveries of elements by filling in the gaps in the periodic table. It serves as an important summary of the properties of elements. After understanding the periodic table, we moved on to learn more about atom, which is the smallest unit of an element. In the past, I had always wondered what the smallest thing on Earth was, and hence I was very interested in this topic and wanted to find out more about atoms. Atoms are built from 3 particles, protons, neutrons and electrons. In an atom, the number of protons (positively-charged) and neutrons (no charge) are the same and that the atomic number indicates the number of protons and electrons in an atom, while the nucleon/mass number indicates the number of protons and neutrons in an atom. I also found out that electrons are of negative charge and thus cancels out the positive charge of a proton. They also occupy different shells at different distances from the nucleus, and thus its electronic configuration. We were also introduced to the term valence electron, which is the shell furthest from the nucleus occupied by electrons (outermost shell). These valence electrons are involved in chemical reactions between elements, which result in the formation of cations (positively charged particle) and anions (negatively charged particles) to obtain a full valence shell in order to achieve the same electronic structure as a noble gas to be stable.


This is done through chemical bonding, where elements try to lose, gain or share electrons in order to get a more stable electron structure. There are a total of three types of chemical bonding – ionic bonding, covalent bonding and metallic bonding; but we will only get to learn the first two, while the latter will be taught the following year. Ionic bonding occurs between metals and non-metals. Ionic bonds result from the transfer of electrons form metal atoms to non-metal atoms forming positive and negative ions. The electrical forces between these oppositely charged ions produce strong ionic bonds. On the other hand, covalent bonding is formed between two atoms of non-metals. It is formed by the sharing of a pair of electrons between two atoms. Each atom contributes one electron to the bond. In order to represent these chemical bonding, we were also taught on how to draw a dot-and-cross diagram, and although I was very confused at the start, I was able to clarify my doubts and managed to overcome the difficulties and learn how to draw a dot-and-cross diagram accurately, labelling charges and label the electrons properly.

Chemical reactions as expressed by chemical equations showing reactants and products. Hence, we have to learn write a proper chemical equation and learn how to balance them. Although balancing chemical equations may be hard and very tedious, we must still master this skill as a equation must be balanced so that it conforms to the Law of Conservation of Matter, which is the fact that the atoms of each element on the right side of the equation as there are on the left side of the equation. This also involves some mathematics for us to calculate the number of atoms in each element on each side of the equation. As the saying goes, “practice makes perfect”, in order for us to master the skill of balancing an equation, our teacher gave us many practices so that we will get use to it and finally master how to balance an equation easily. This definitely helps me to build a strong foundation in this aspect and it will prove beneficial in the future.
Example:
4Fe + 3O2 --> 2 Fe2O3
Left Side:
4 atoms Fe, 6 atoms O
Right Side:
4 atoms Fe, 6 atoms O

We then move on to learn more about acids and bases. Chemical reactions involving acids and bases play an important role in our lives – they can be found in the kitchen, laundry, garden, swimming pool, plants, in our body, everywhere! To be able to understand how things around us work, we have to understand the concepts behind acids and bases. An acid is a substance which produces hydrogen ions as the only positive ions when it is dissolved in the water. They can be classified as weak or strong acid and the strength of an acid depends on its degree of dissociation / ionization in water to form hydrogen ions. For example, hydrochloric acid is a strong acid as it dissociates completely in water to produce hydrogen ion, while ethanoic acid, a weak acid, dissociates partially in water to produce few hydrogen ions. Bases are oxides or hydroxides of metal that reacts with an acid to form a salt and water only, while an alkali is metal hydroxide which is soluble in water and produces hydroxide ions in water. As a result, we can see that all alkalis are bases, but not all bases are alkalis. Alkalis can also be classified as strong or weak. A strong alkali like sodium hydroxide is one that dissociates completely in water to produce hydroxide ions and there are no molecules left, while weak alkalis like ammonia is one that dissociates partially in water to produce few hydroxide ions.


Besides know about acids and bases, we also had to know about the reactions of acids with metals, carbonates, and bases, and bases with ammonium salts. We had to know the products formed after the various reactions, as well as the observations. To allow us to understand this better, we went to the laboratory to conduct various experiment about the different reactions and take a closer look at the products formed and the happenings during the reactions. We also had to test for the products formed and confirm what the products are. We also learnt about the various colour indicators, namely litmus paper, methyl orange, phenolphthalein and the universal indicators; and what they are used to test for. In this way, we had a deeper impression on the various reactions and this allowed us to grasp the concepts in this topic better.
Examples
2HCl + Zn --> ZnCl2 + H2
(Acid + Metal --> Salt + Hydrogen)
Na2CO3 + H2SO4 --> Na2SO4 + CO2 + H2O
(Acid + Carbonate --> Salt + Carbon Dioxide + Water)
MgO + H2SO4 --> MgSO4 + H2O
(Acid + Base --> Salt + Water)
NaOH + NH4Cl --> NaCl + NH3 + H2O
(Base + Ammonium Salt --> Salt + Ammonia + Water)

On top of these, we also had to know how some of these reactions are applied in our daily lives. For example, when soils become too acidic from extensive use of fertilizers and from acid rain, it can be neutralized by adding calcium hydroxide, neutralizing the acid in the soil. Toothpastes also neutralize the acid on our teeth produced by bacteria as it is an alkali. Excess acid in our stomach can also make us feel unwell, hence by taking the antacid “milk of magnesia”, it neutralizes the hydrochloric acid in our stomach, making us feel better. I find this topic of acids and bases very interesting as it is largely applicable in our daily lives and through the understanding of these chemical reactions like neutralization, I will be able to clarify my doubts on how taking things like ENO and “milk and magnesia” can help to relief stomachache.
This topic revolves around the theme light – how it reflects and refracts. Hence, we were first introduced to light, which wasn’t a very new topic for us as it was previously covered in primary school. We learnt that Light is the form of energy that enters our eyes and enables us to see things and it moves very fast at a speed of 300 000 000 m/s. Light also travels in a straight line. After the introduction of light, we were then taught on the various terms used in the reflection of light and the laws that apply. The first law is that the incident ray, the reflected ray and the normal at the point of incidence all lie in the same plane. The second law is that the angle of incidence is equal to the angle of reflection. Besides learning about the two laws of reflection, we also learnt about the 2 types of reflection, namely specular and diffused reflection. Characteristics of the plane mirror were also important as it can vary with concave mirrors. After grasping the main concepts in reflection, we also needed to know how to apply them. Although applying the key concepts was rather easy, the hard part was to know how to construct ray diagrams as there are many steps involved. However, after understanding the use of each of the steps, I was able to construct the ray diagrams easily and accurately.


As for refraction, this was a completely new topic to me as I have not heard of it before. Refraction is being defined as the bending of light from one optical medium to another optical medium of different density. In refraction, there were definitely more things we needed to know and the ray diagrams were thus harder to draw. I found the normal very helpful as it helped me to know how the ray bends from one optical medium to another; it has made refraction easier for me as we just needed to know how the ray actually reflects – towards the normal or away from the normal. We were also introduced on how to find the refractive index of a particular medium, using the function sine, and the angel of incidence and refraction. Next, we also learnt about critical angle and total internal reflection. Critical angle is defined as the angle of incidence in the optically denser medium when the angle of refraction in the optically less dense medium is 90 degrees; while total internal reflection occurs when the incident ray is in the optically denser medium and the angle of incidence is greater than the critical angle. 100% of the light is reflected within glass itself. There is no refraction at all. Although this topic on reflection and refraction might be very straightforward, we have to learn how to draw the diagrams representing each of the phenomena accurately. This topic also relates to our daily lives, as mirrors are seen all over the place, whether in dental clinics, in our bathroom, or one roads, where concave mirrors are put in place to prevent car accidents from occurring. There are also several practical sessions for us to observe the reflection and refraction of light so as to allow us to have a better understanding of this topic.


This topic is a relation to the topic of lenses. To introduce us to this topic, we were first quizzed on some questions like how a rainbow forms and what actually causes sunsets. We learnt that these phenomenons are caused by dispersion of light, where white light is separated into its constituent bands of colours, namely, red, orange, yellow, green, blue, indigo, and violet, which is also known as the visible spectrum. These seven colours are separated due to their contrasting wavelengths, with red having the shortest wavelength and violet having the longest wavelength. In order to allow us to remember these colours in the correct sequence, we were introduced to the acronym ROY. G BIV. Next, we also learnt that white light is produced by mixing three primary colour components, namely red, green and blue. These primary colours can be mixed together to form three different secondary colours. Acronyms were also given to us help us to remember these combinations.
Red + Blue = Magenta (Ren Min Bi)
Blue + Green = Cyan (BCG – a type of injection)
Green + Red = Yellow (Great Yellow River)
We also told that we must understand these 2 concepts:
• The colour of an object depends on the colour of light being reflected to the observer.
• A coloured filter is a type of plastic or glass that only allows its own colour component of light to pass through.
• Black is an indication of no light.
Through these 3 examples, we were able to apply them to the various examples given to us on why certain colours appear differently in different colour lighting, as well as recognize what colours will be observed in a particular colour filter.
Hence, I found this topic relatively easier compared to the other topics as we did not have to memorize anything much and merely have to understand the basic concepts behind the different colours of light.


This topic was not new to us and we were very familiar with it as we had already covered it during primary school. However, there were many more new terms introduced to us and this topic was more in-depth as compared to the primary syllabus and much more things were covered. We were first shown a picture of the parts of the flower and the teacher pointed out some of the more important parts such as the anthers, stigmas and ovaries, which were necessary for pollination as well as fertilization. There are two types of pollination in flowering plants, namely self pollination and cross pollination. We learnt about the features, advantages and disadvantages of each type of pollination and were also told that the probability of self pollination was much higher than cross pollination due to the proximity of the anther and stigma in the same flower. There were also many differences between the features of wind-pollinated and insect-pollinated flowers, such as the shapes of the anthers and stigmas, as well as the colours and size of the petals. Moving on to fertilization, we were learnt about what happens when a pollen grain lands on the stigma of a flower and how it travels to the ovule and fuses with the female gametes. We were also introduced to the new term called double fertilization, where the generative nucleus will split into two male gametes, in which one will fuse with the ova to form the zygote, while the other will fuse with the definitive nucleus to form the endosperm. After fertilization, the fruits and seeds are formed and they have to be dispersed to prevent overcrowding and competition with parent plant for sunlight, water, nutrients and space, as well as to conquer new territories. There are four ways of dispersion, namely water, wind, animal and mechanical, and they have unique and distinctive feature special only to the particular mode of dispersal. And after dispersal, a new plant grows and the whole cycle will repeats itself.


Sexual reproduction is the biological process where new individuals are made from older ones through the fusion of two very specialized cells known as gametes, also known as fertilization. We first learnt about the basic differences between sexual and asexual reproduction, in which we were told that both of them are very important to ensure the continuity of a kind. We were then introduced to puberty as well as the male and female reproductive system. We were briefly taught on the important parts in both the female and male reproductive systems and their functions, and we introduced to the gonads; testis for the male and ovaries for the females, with the testes producing the sperms while the ovaries producing the egg. Moving on, we were then taught on the menstrual cycle, which refers to a cycle of physiological changes that occur in a fertile woman’s reproductive system. I found this very confusing as there are various phases in this cycle, namely menstruation-follicular phase, ovulation and luteal phase. There are also many different types of hormones and the levels of these hormone drop and rise at different times, thus its complicacy. After being introduced to copulation and post-fertilization periods, we were then introduced to the various Sexually Transmitted Diseases. To make things more interesting, we were broken into groups and told to draw a comic of the various STDs, including syphilis, gonorrhea as well as AIDS. After learning more on STDs, we were then warned of the issues regarding sex and family planning, which refers to the process involving the planning of when and how many children to have. Poor family planning can lead to unwanted or unplanned pregnancies, which has its devastating effects. In order to prevent this, family planning often involves the use of various birth control methods, namely natural, chemical, mechanical, hormonal and surgical. To warn us on the effects of premarital sex and abortion, our teacher let us watch a video, which included disgusting and inhumane photos of babies being aborted. It showed how premarital sex can result in such emotional and psychological consequences. In order to let this happen, family planning is essential.

No comments:
Post a Comment